
Sentiment Analysis with Hugging Face Transformers
Sentimental Analysis, PTIT , Department of Computer Science, 2024
CS224N: Hugging Face Transformers Tutorial (Winter ‘22)
Stanford University
Original Author: Ben Newman
This guide introduces how to use Hugging Face’s Transformers library for NLP tasks, specifically sentiment analysis. It covers installing necessary libraries (transformers, datasets, accelerate), importing essential modules, and setting up utility functions to visualize tokenized data. The main focus is on using two core components ;
- tokenizer, which converts text into model-ready IDs.
- model that makes predictions based on this input. With a step-by-step explanation, the guide shows how to choose and load pre-trained models from the Hugging Face Hub, process text data, and interpret model predictions. It’s a practical, beginner-friendly resource for building a foundation in NLP with Hugging Face.
Hugging Face Transformer for NLP Tasks
For a practical notebook demonstrating Hugging Face Transformers in NLP, check out the Hugging Face Transformer for NLP Task Notebook on GitHub.
Installing Required Libraries
!pip install transformers
!pip install datasets
!pip install accelerate
This block installs three libraries:
- Transformers Provides pre-trained transformer models and tokenizers from Hugging Face.
- Datasets A library for easily accessing and working with various datasets, useful for NLP tasks.
- Accelerate Helps with distributed training and optimizing model performance.
Importing Necessary Modules
from collections import defaultdict, Counter
import json
from matplotlib import pyplot as plt
import numpy as np
import torch
This block imports several Python libraries
defaultdict,CounterfromcollectionsFor counting and handling dictionary operations.jsonFor working with JSON data.pyplotfrommatplotlibFor plotting and visualizing data.numpyFor working with arrays and numerical computations.torchFor working with PyTorch, a machine learning framework.
Utility Function for Printing Encodings
def print_encoding(model_inputs, indent=4):
    indent_str = " " * indent
    print("{")
    for k, v in model_inputs.items():
        print(indent_str + k + ":")
        print(indent_str + indent_str + str(v))
    print("}")
This block defines a utility function to print the tokenized input/output data in a formatted way. It helps visualize the encoding structure in a more readable format.
Hugging Face Transformers Usage Pattern
The code explains a common pattern when working with Hugging Face transformers.
- Model and Tokenizer Initialization
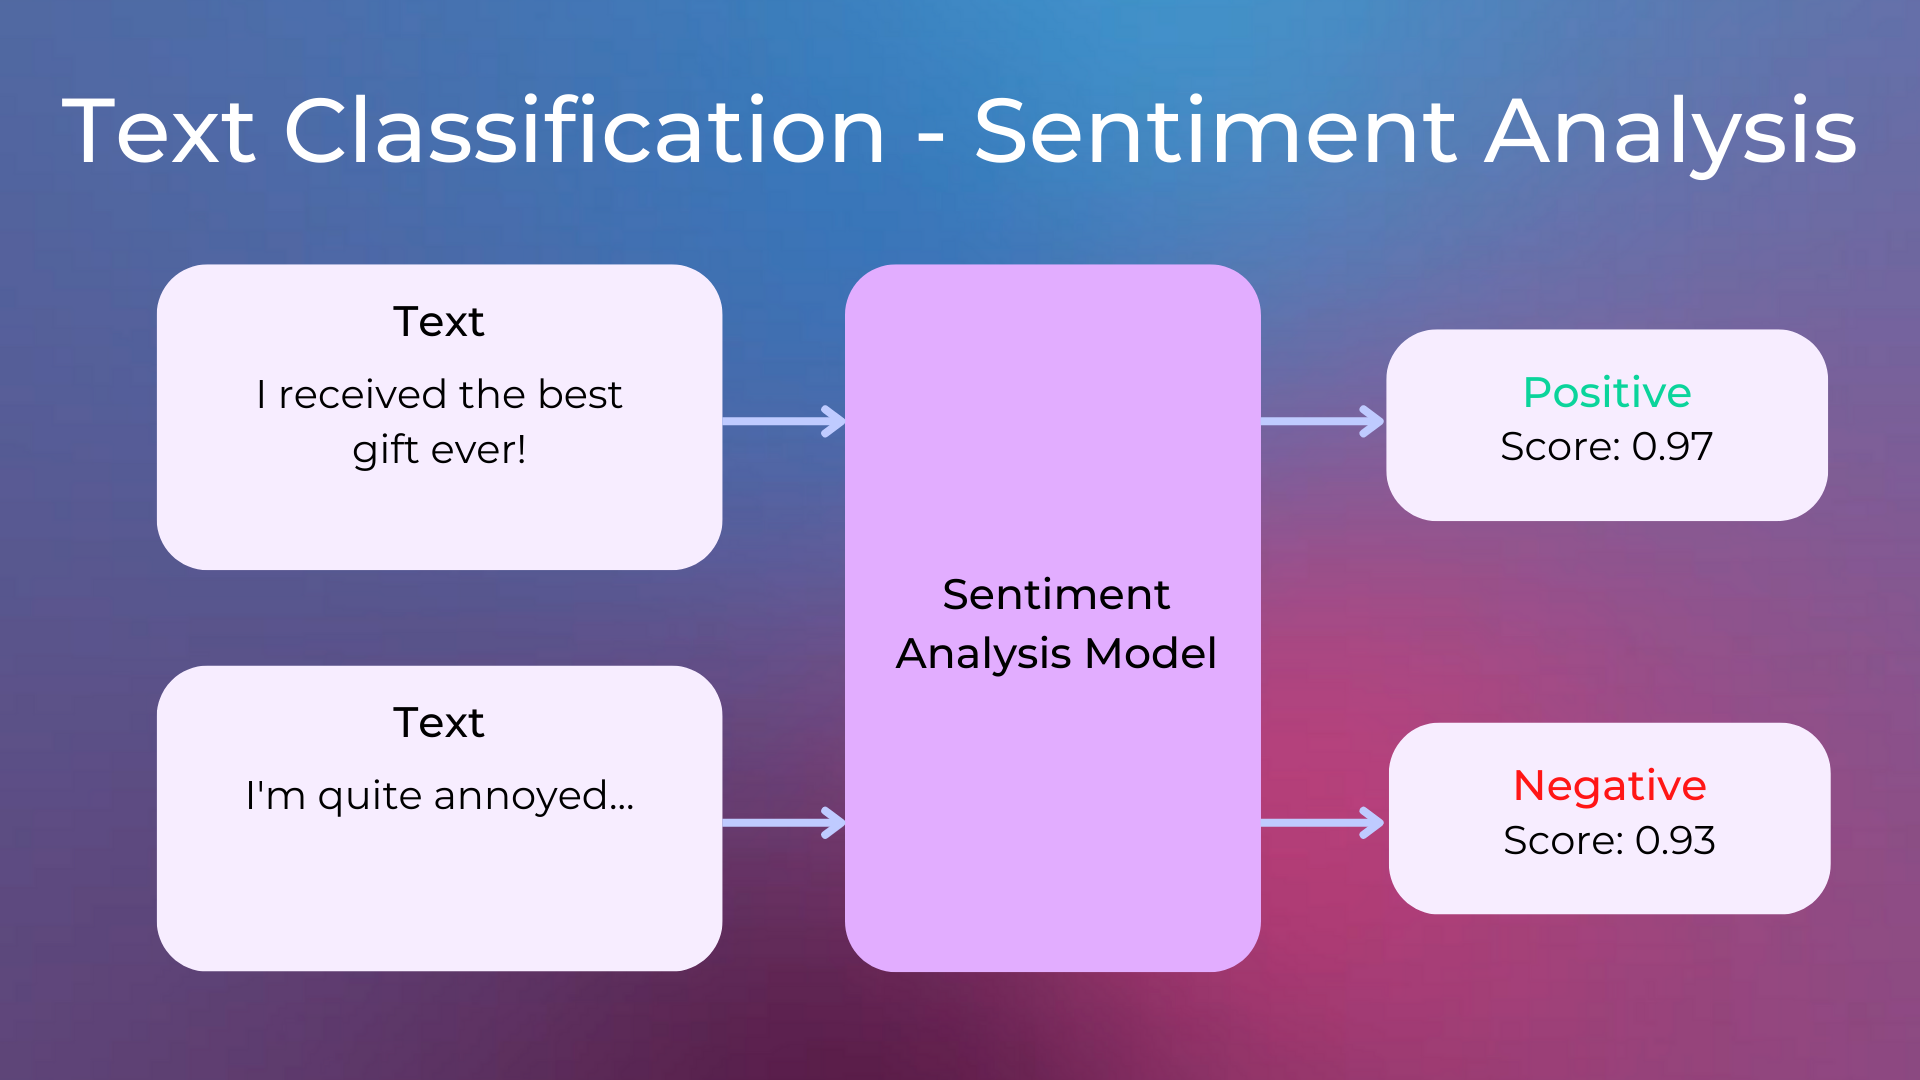
from transformers import AutoTokenizer, AutoModelForSequenceClassification tokenizer = AutoTokenizer.from_pretrained("siebert/sentiment-roberta-large-english") model = AutoModelForSequenceClassification.from_pretrained("siebert/sentiment-roberta-large-english")AutoTokenizerConverts text to a list of vocabulary IDs.AutoModelForSequenceClassificationLoads the pre-trained model for sentiment classification.
- Tokenizing Input and Getting Model Output
inputs = "I'm excited to learn about Hugging Face Transformers!" tokenized_inputs = tokenizer(inputs, return_tensors="pt") outputs = model(**tokenized_inputs)tokenizer()Converts the input string into model-friendly format (tensor).model()Runs the tokenized inputs through the model to get the prediction.
- Making Predictions:
labels = ['NEGATIVE', 'POSITIVE'] prediction = torch.argmax(outputs.logits) print(f"The prediction is {labels[prediction]}")- Uses
torch.argmaxto find the highest prediction (positive or negative) from the model’s output logits.
- Uses
Tokenizers
- Loading Different Tokenizers
from transformers import DistilBertTokenizer, DistilBertTokenizerFast, AutoTokenizer tokenizer = DistilBertTokenizer.from_pretrained(name) tokenizer = DistilBertTokenizerFast.from_pretrained(name) tokenizer = AutoTokenizer.from_pretrained(name)DistilBertTokenizerSlow Python tokenizer.DistilBertTokenizerFastFast Rust-based tokenizer.AutoTokenizerAutomatically uses the fast version if available.
- Tokenizing Input String
tokenized_inputs = tokenizer(input_str) print_encoding(tokenized_inputs)- Converts a string into token IDs, printing the results.
- Adding Special Tokens
cls = [tokenizer.cls_token_id] sep = [tokenizer.sep_token_id] input_tokens = tokenizer.tokenize(input_str) input_ids_special_tokens = cls + input_ids + sep decoded_str = tokenizer.decode(input_ids_special_tokens)cls_token_idandsep_token_idSpecial tokens (e.g., CLS is used for classification tasks).- Adds these special tokens around the tokenized input and decodes them back to the string.
Models
- Loading Models
base_model = DistilBertModel.from_pretrained('distilbert-base-cased') model = DistilBertForSequenceClassification.from_pretrained('distilbert-base-cased', num_labels=2)- Loads two models one for getting base representations (
DistilBertModel), and another for classification tasks (DistilBertForSequenceClassification).
- Loads two models one for getting base representations (
- Random Initialization of Weights
configuration = DistilBertConfig() model = DistilBertForSequenceClassification(configuration)- Initializes a model with random weights instead of using pre-trained ones. Useful for training from scratch.
- Passing Inputs to the Model
model_outputs = model(**model_inputs)- Runs the tokenized inputs through the model and prints the outputs.
- Calculating Loss and Backpropagation
label = torch.tensor([1]) loss = torch.nn.functional.cross_entropy(model_outputs.logits, label) loss.backward()- Calculates the classification loss using
cross_entropyand performs backpropagation to update the model’s parameters.
- Calculates the classification loss using
Hidden States and Attention Weights
- Extracting Hidden States and Attention Weights
model = AutoModel.from_pretrained("distilbert-base-cased", output_attentions=True, output_hidden_states=True) model.eval() model_output = model(**model_inputs)- Outputs both hidden states and attention weights, useful for understanding model behavior.
- Visualizing Attention Weights
fig, axes = plt.subplots(6, 12) for layer in range(n_layers): for i in range(n_heads): axes[layer, i].imshow(model_output.attentions[layer][0, i])- Plots the attention weights to visualize how the model attends to different tokens across layers and heads.
Let’s break down the fine-tuning process block by block:
Loading the Dataset
from datasets import load_dataset, DatasetDict
dataset_name = "stanfordnlp/imdb"
imdb_dataset = load_dataset(dataset_name)
load_dataset: Loads the IMDb dataset from Hugging Face, which contains movie reviews labeled as positive or negative.DatasetDict: Allows you to create custom train-validation splits for datasets.
Truncating Text for Speed
def truncate(example):
    return {
        'text': " ".join(example['text'].split()[:50]),
        'label': example['label']
    }
- truncate: This function truncates the text in each example to the first 50 tokens (words). This is done to reduce the dataset size for faster processing during this demonstration.
Creating a Smaller Subset for Training and Validation
small_imdb_dataset = DatasetDict(
    train=imdb_dataset['train'].shuffle(seed=1111).select(range(128)).map(truncate),
    val=imdb_dataset['train'].shuffle(seed=1111).select(range(128, 160)).map(truncate),
)
- DatasetDict: Creates a smaller version of the dataset, with 128 examples for training and 32 for validation.
- shuffle: Randomly shuffles the dataset with a fixed seed for reproducibility.
- select: Selects specific examples from the shuffled dataset.
Tokenizing the Dataset
small_tokenized_dataset = small_imdb_dataset.map(
    lambda example: tokenizer(example['text'], padding=True, truncation=True),
    batched=True,
    batch_size=16
)
- tokenizer: Uses a tokenizer (from Hugging Face) to convert the text into a format the model can understand (token IDs).
- batched=True: Tokenizes the dataset in batches of 16 examples.
- padding=True: Adds padding to ensure all input sequences have the same length.
- truncation=True: Truncates sequences that exceed the maximum length allowed by the model.
Preparing Dataset for PyTorch
small_tokenized_dataset = small_tokenized_dataset.remove_columns(["text"])
small_tokenized_dataset = small_tokenized_dataset.rename_column("label", "labels")
small_tokenized_dataset.set_format("torch")
- remove_columns: Removes the original text since we no longer need it after tokenization.
- rename_column: Renames the
labelcolumn tolabels, as the model expects it. - set_format(“torch”): Converts the dataset into PyTorch tensors, which are compatible with the model.
Creating DataLoaders for Training and Validation
from torch.utils.data import DataLoader
train_dataloader = DataLoader(small_tokenized_dataset['train'], batch_size=16)
eval_dataloader = DataLoader(small_tokenized_dataset['val'], batch_size=16)
- DataLoader: Creates iterators for batching the data during training and evaluation. This allows efficient processing in batches.
Training
- Setting Up Training Parameters ```python from transformers import AdamW, get_linear_schedule_with_warmup from tqdm.notebook import tqdm
model = DistilBertForSequenceClassification.from_pretrained(‘distilbert-base-cased’, num_labels=2)
num_epochs = 1 num_training_steps = len(train_dataloader) optimizer = AdamW(model.parameters(), lr=5e-5, weight_decay=0.01) lr_scheduler = get_linear_schedule_with_warmup(optimizer, num_warmup_steps=0, num_training_steps=num_training_steps)
- **AdamW**: The optimizer used for fine-tuning the model with weight decay.
- **get_linear_schedule_with_warmup**: Sets up a learning rate scheduler that gradually increases the learning rate at the start of training (warmup).
- **DistilBertForSequenceClassification**: Loads a pre-trained DistilBERT model tailored for sequence classification.

2. **Training Loop**
```python
for epoch in range(num_epochs):
    model.train()
    for batch_i, batch in enumerate(train_dataloader):
        optimizer.zero_grad()
        output = model(**batch)
        output.loss.backward()
        optimizer.step()
        lr_scheduler.step()
        progress_bar.update(1)
- model.train(): Sets the model to training mode.
- optimizer.zero_grad(): Clears the gradients before each update.
- output.loss.backward(): Computes gradients via backpropagation.
- optimizer.step(): Updates the model parameters.
- lr_scheduler.step(): Updates the learning rate according to the schedule.
Validation Loop
model.eval()
for batch_i, batch in enumerate(eval_dataloader):
    with torch.no_grad():
        output = model(**batch)
    loss += output.loss
avg_val_loss = loss / len(eval_dataloader)
- model.eval(): Sets the model to evaluation mode (disables dropout layers).
- torch.no_grad(): Disables gradient computation during evaluation, which saves memory.
- avg_val_loss: Computes the average validation loss to monitor the model’s performance.
Trainer API Example
- Trainer and TrainingArguments
from transformers import TrainingArguments, Trainer training_args = TrainingArguments( output_dir="sample_hf_trainer", per_device_train_batch_size=16, num_train_epochs=2, evaluation_strategy="epoch", save_strategy="epoch", learning_rate=2e-5, load_best_model_at_end=True, logging_dir=os.path.join("sample_hf_trainer", "logs"), )- TrainingArguments: Configures the training process, including batch size, number of epochs, learning rate, and evaluation strategy.
- Trainer: A high-level API that abstracts away the manual training loop.
- Defining Metrics
def compute_metrics(eval_pred): logits, labels = eval_pred predictions = np.argmax(logits, axis=-1) return {"accuracy": np.mean(predictions == labels)}- compute_metrics: A function to compute evaluation metrics like accuracy during training and evaluation.
- Training with Trainer
trainer = Trainer( model=model, args=training_args, train_dataset=small_tokenized_dataset['train'], eval_dataset=small_tokenized_dataset['val'], tokenizer=tokenizer, compute_metrics=compute_metrics ) trainer.train()- Trainer.train(): Starts the fine-tuning process.
- Evaluation and Prediction
results = trainer.evaluate() predictions = trainer.predict(small_tokenized_dataset['val'])- trainer.evaluate(): Evaluates the model on the validation set.
- trainer.predict(): Makes predictions on the validation set and returns the logits.
- Loading a Saved Model from Checkpoint
finetuned_model = AutoModelForSequenceClassification.from_pretrained("sample_hf_trainer/checkpoint-8")- AutoModelForSequenceClassification: Loads a previously saved model checkpoint for further use.
- Testing on New Data
test_str = "I enjoyed the movie!" model_inputs = tokenizer(test_str, return_tensors="pt") prediction = torch.argmax(finetuned_model(**model_inputs).logits) print(["NEGATIVE", "POSITIVE"][prediction])- test_str: A new sentence for which we want to predict sentiment.
- torch.argmax: Finds the index of the highest score to determine if the sentiment is positive or negative.